Recently, one of my colleagues sent me a really cool Intune application patching report that they were working on and I wanted to see if I could make the data collection more automated / dynamic. Now, It’s been a LONG time since I’ve dipped my toes into the headache that is PowerBI, but once I see a challenge, it’s difficult for me to leave it alone…
I’ve actually written about this before - back in 2018 I ran into the exact same problem - how do you authenticate to Graph to pull back data using a custom AAD application when PowerBI doesn’t allow you to specifically define your authentication parameters?
At the time, I wrote about building a “middleware” solution that involved an Azure function application that handled the authentication as well as the Graph queries and simply returned the results back to the report. That solution still works just fine, but if we want people that aren’t nerds like me to actually use the reports, we ideally want a solution that has the authentication piece baked directly into the file.
Well, it turns out all the pieces I need to have that work have been staring me in the face for years. Yes there is still no native way to define your authentication method, but with a little bit of work, you 110% can authenticate to Graph using any AAD application that you want.
The secret of it all turns out to be quite simple. As I wrote about in my article about authenticating to Graph, if you know how the authentication requests are built, you can actually build the requests WITHOUT the libraries. Understanding that, we then need to simply build a way to have end users input their authentication parameters into a function that builds the authentication request for you.
Luckily in PowerBI we can do this very easily (Sorry to all PowerBI nerds out there who already know this). All we need to do is prepare a few parameters and write a custom function query that will act as our tooling.
Let’s start by creating a new empty report. We want to dive right into the guts of PowerBI, so select Transform data to enter the Power Query Editor.
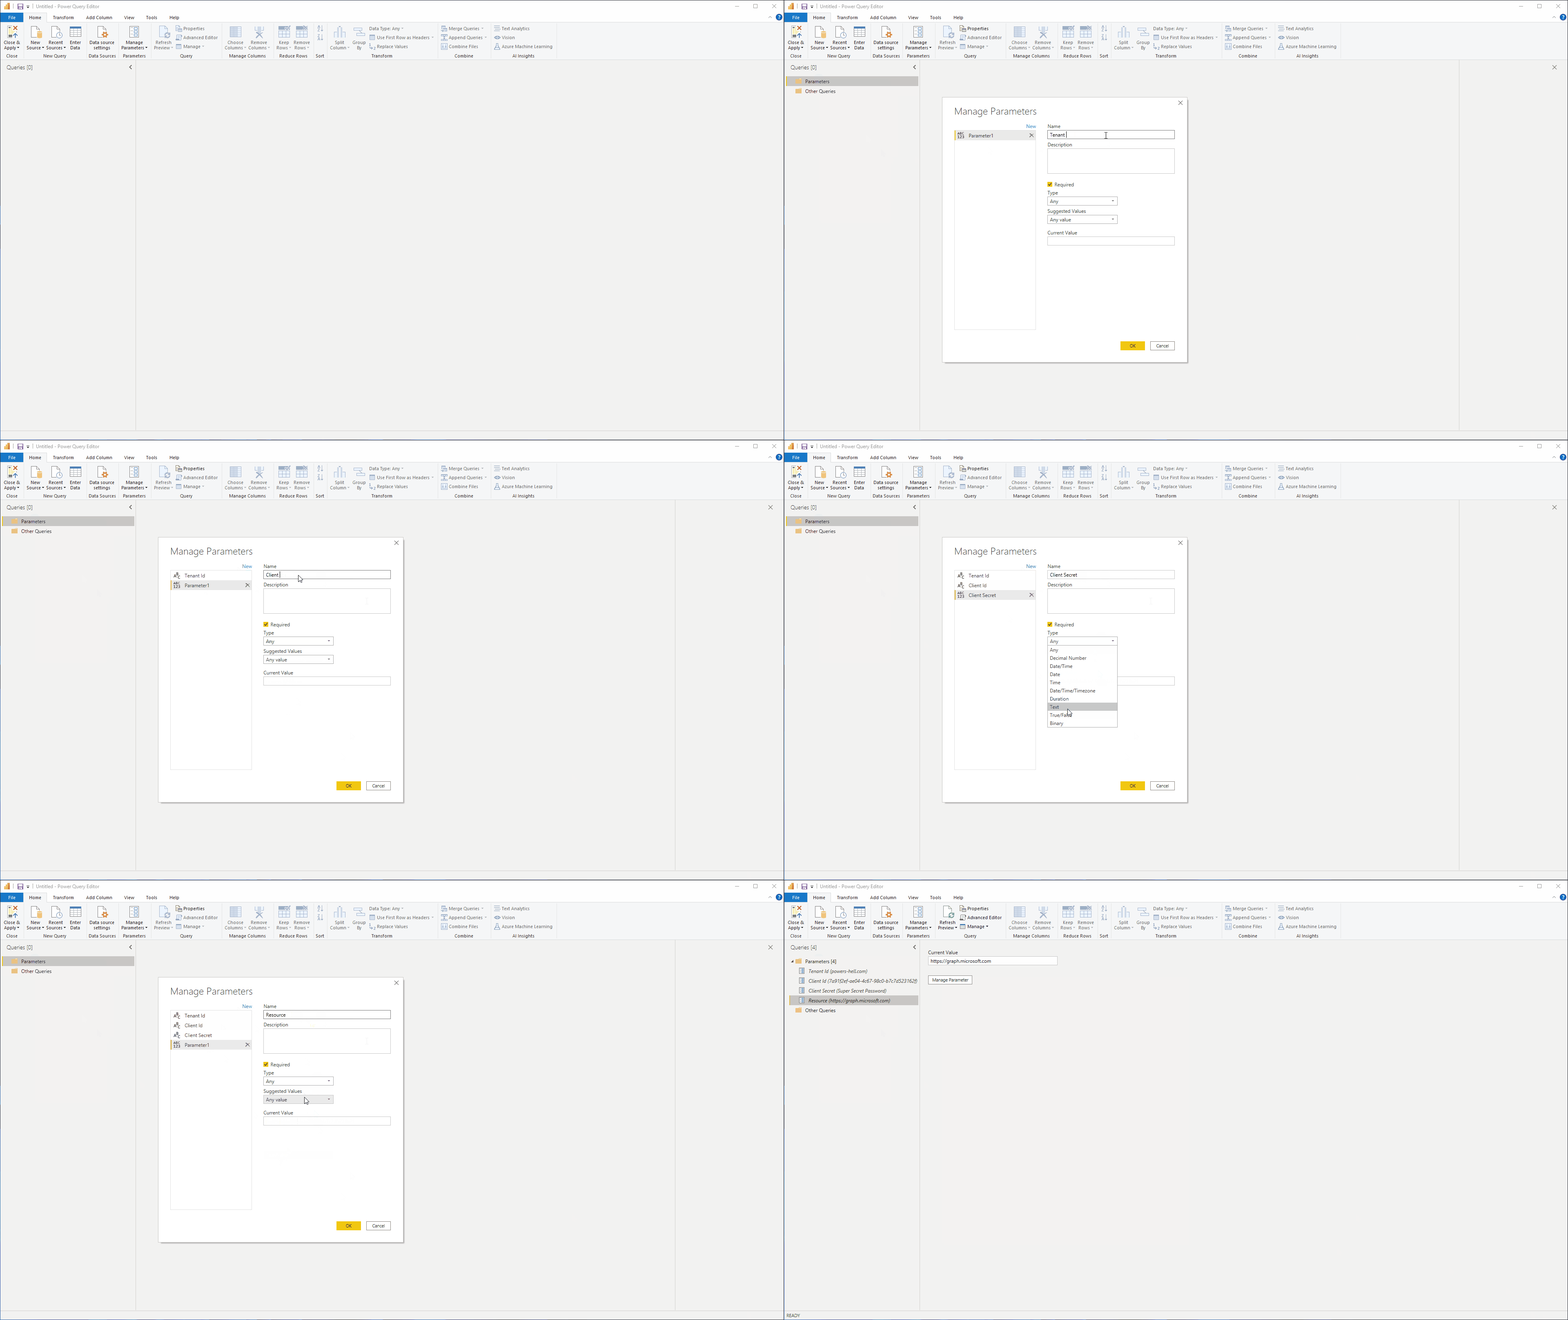
Now let’s create the necessary parameters we want the end user to populate. Right click on the queries pane and select New Parameter. We will then build out the following parameters. Feel free to put them into groups - It just looks so much neater.
| Parameter Name | Type | Current Value |
|---|---|---|
| Tenant Id | Text | Your Tenant Id / Url |
| Client Id | Text | Your AAD application Id |
| Client Secret | Text | Your AAD appplication client secret |
| Resource | Text | https://graph.microsoft.com |
Alright, now that we have our parameters, let’s build our first function. Select New Source > Blank Query and then select Advanced Editor to bring up the editor. The code we will place into this new blank query is below.
(_tenantId as text, _clientId as text, _clientSecret as text, _resource as text, _grantType as text, _scope as text) as text =>
let
    Url = "https://login.microsoftonline.com/"&_tenantId&"/oauth2/token",
    Body = "resource="&_resource&"&client_id="&_clientId&"&grant_type="&_grantType&"&scope="&_scope&"&client_secret="&_clientSecret,
    Options = [
        Content = Text.ToBinary(Body)
    ],
    Response = Web.Contents(Url,Options),
    ParsedJson = Json.Document(Response),
    ConvertedToken = "Bearer "&ParsedJson[access_token]
in
    ConvertedToken
What we have above is actually quite simple:
- The first line defines the parameters and their types that will be accepted into our function.
- The rest of the code in the let segment simply builds out the request URL, request body & posts the request.
- Finally, we pull out the access token from the response and prepend “Bearer” to it, so we can use it for any future queries.
Now that we have our reusable function to authenticate, give the query a name (I’ve called mine “Get-AuthenticationHeader”), and let’s create another blank query and fill the advanced editor with the following code..
(_graphURL as text) =>
let
    AuthHeader = #"Get-AuthenticationHeader"(#"Tenant Id", #"Client Id", #"Client Secret", Resource, "client_credentials", "openid"),
    Options = [
        Headers = [
            Authorization = AuthHeader,
            #"Content-Type" = "Application/Json"
        ]
    ],
    WebRequestContent = Web.Contents(_graphURL,Options),
    JsonContent = Json.Document(WebRequestContent),
    ParsedResults = JsonContent[value],
    Converted = Table.FromList(ParsedResults, Splitter.SplitByNothing(), null, null, ExtraValues.Error),
    Expanded = Table.ExpandRecordColumn(Converted,"Column1",
                    Record.FieldNames(Converted[Column1]{0}),
                    Record.FieldNames(Converted[Column1]{0}))
in
    Expanded
As with our authentication function, give this one a name (I’ve called mine “Invoke-GraphRequest”).
What’s cool about the above function is it calls the first function for us, so that we only need to interface with the second function and provide a single parameter, which is the URL of the Graph endpoint we want to pull back into PowerBI.
There’s a bit more going on after we pull back the data, specifically we convert the resultant data from a list of records to a table of data using the property names as the column names… Exciting stuff, right?
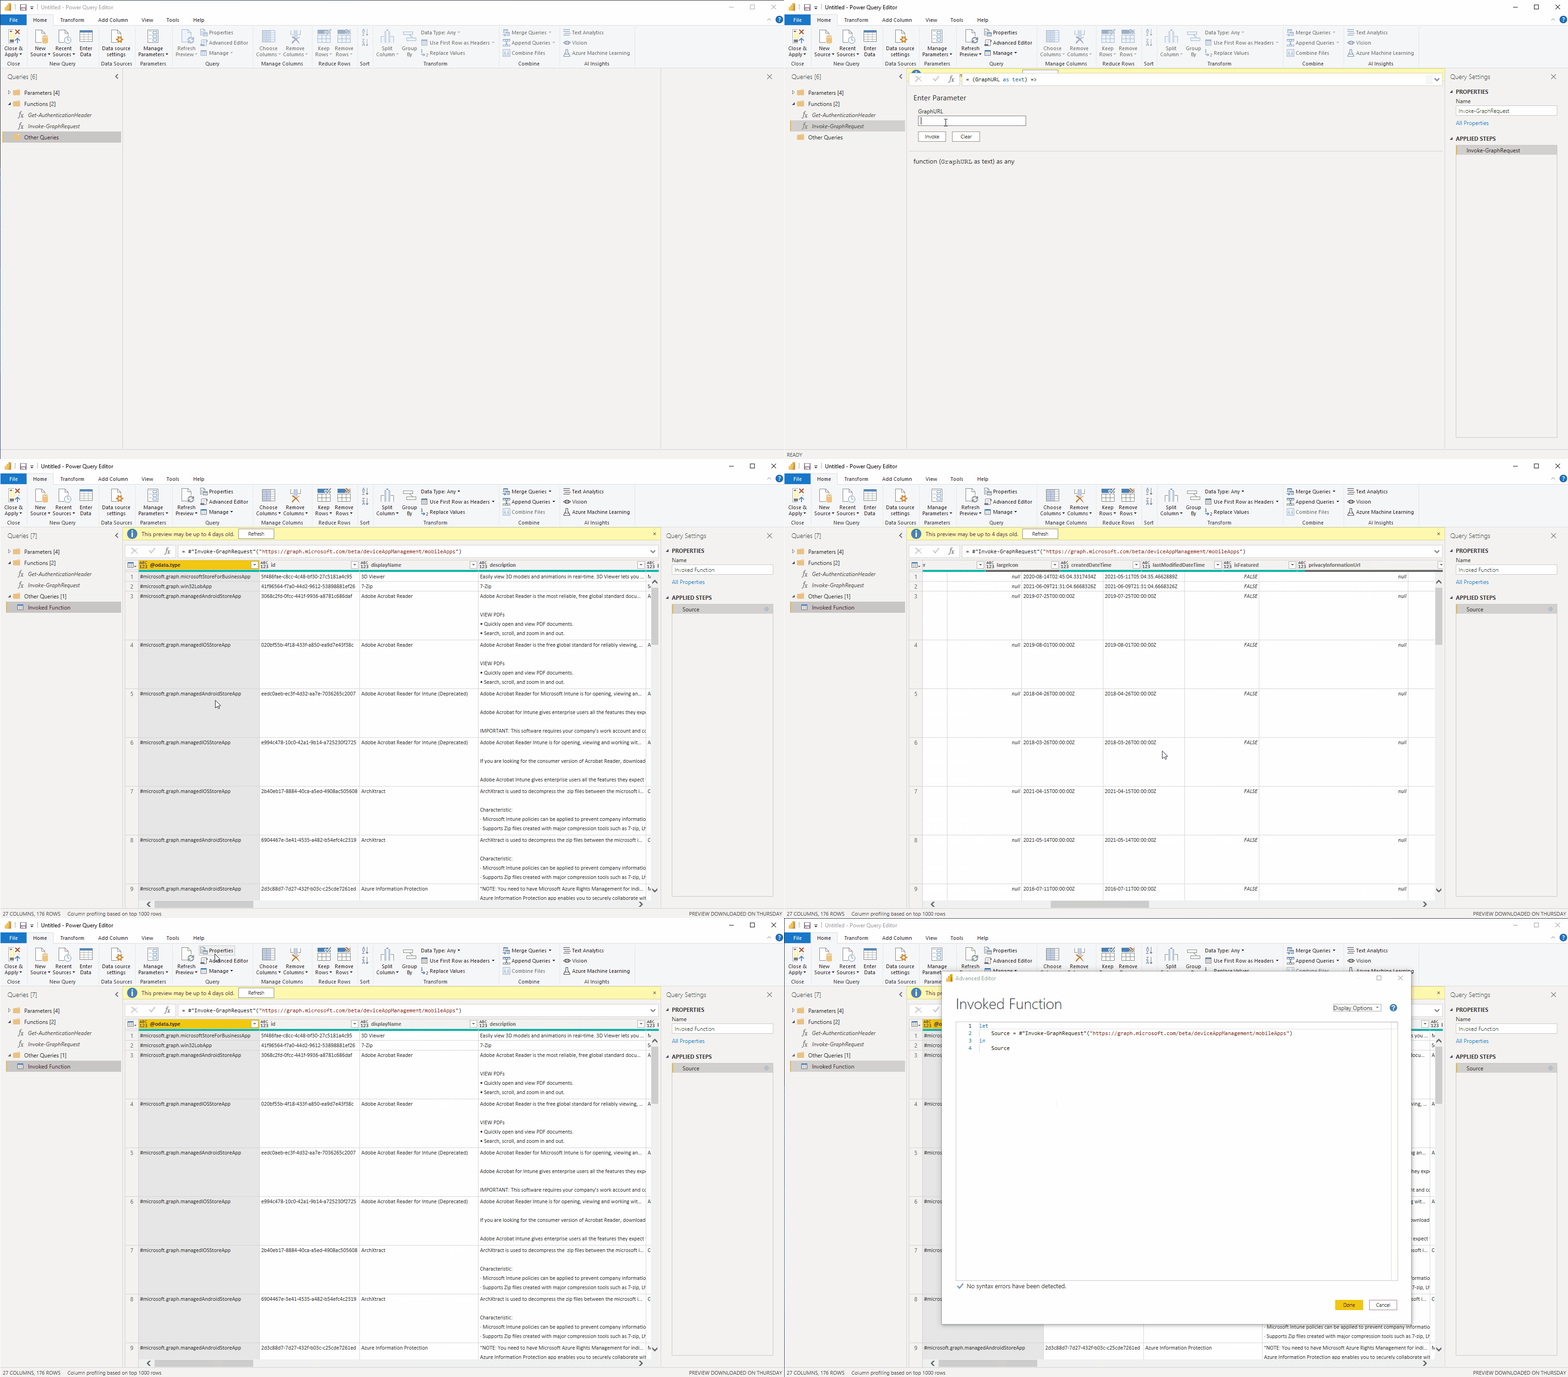
OK - we now have two helper functions, let’s actually start pulling some data in. Let’s click on the Invoke-GraphRequest function and we should see a nice interface asking us to enter a parameter to insert into the function. I want to look at all the apps in my tenant, so I’m going to query https://graph.microsoft.com/beta/deviceAppManagement/mobileApps so I’ll put that address into the function and press invoke.
FANCY!!
Looking at the code behind that this invoked function generates shows us how simple things are now that we have abstracted out the process into two unique functions..
let
    Source = #"Invoke-GraphRequest"("https://graph.microsoft.com/beta/deviceAppManagement/mobileApps")
in
    Source
As you can see, we have a single request which is just invoking the second function we created with the single Graph URL as a parameter input.
Now you have a simple framework to collect as many endpoint datasets as you want - just find what the endpoint URL is and build a query.
There is a litte more that should be done before this is used in production - specifically, the second function should support paging so that it can collect all data available incase it is broken out into pages of data, but that should not be too hard to accomplish. Once I’ve written that I’ll come back and edit this post. If anyone else feels like figuring it out, feel free to leave the code in a comment below.
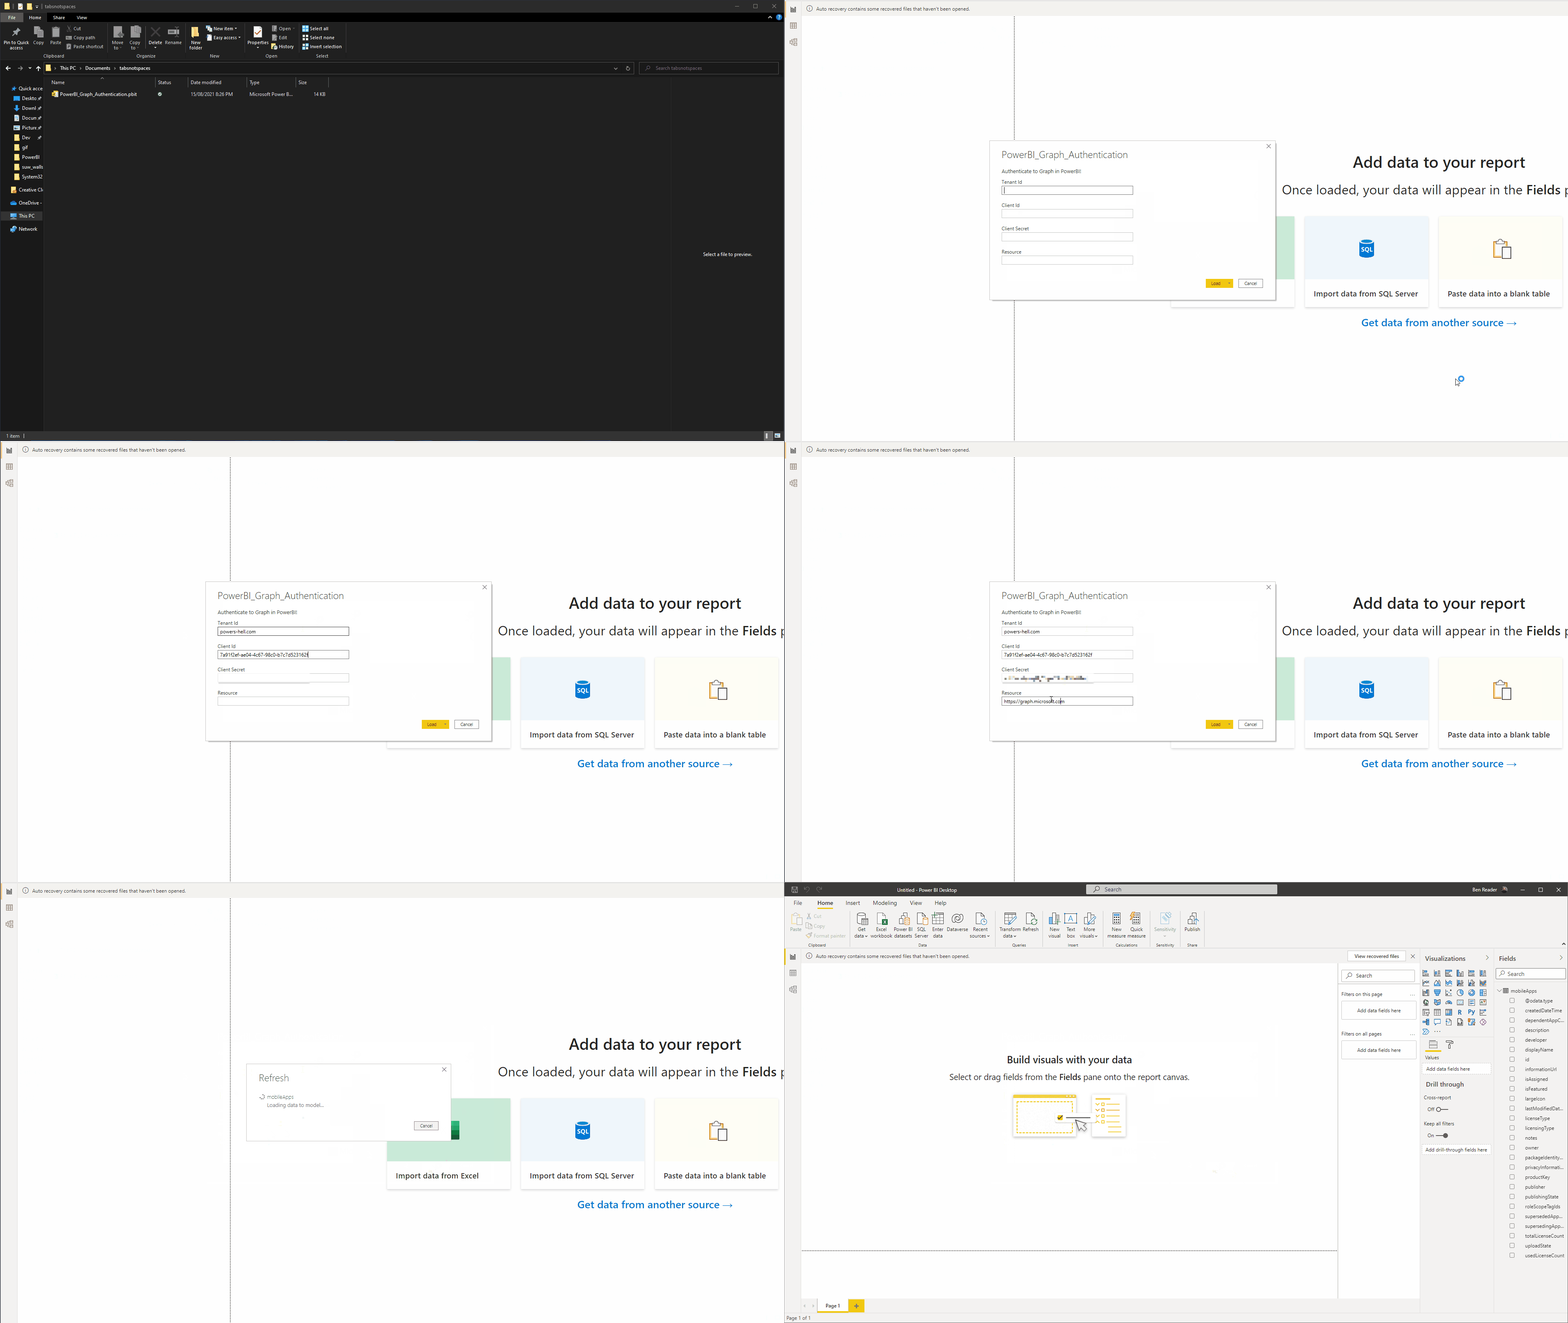
But now the cool thing is, if we save this PowerBI report as a template and send it to someone, they will open it & it will ask them to fill out the parameters, and as if by magic, will populate out the reports we generated!
I personally can’t wait to close PowerBI and never open it again for another 5 years!
Love this? Hate it? Have a better solution? Let me know on twitter or leave a comment below.
For those who don’t want to build a template from scratch - don’t worry. I’ve put the template built from this post on GitHub.
— Ben


