
In the
last post, we connected a local Kubernetes cluster to Azure using Azure Arc so that we could manage it from the Azure portal.
Which is cool, but if all we do is stare at our cluster from Azure, we are missing the fun part.
What I really want from this setup is the ability to run workloads locally that can authenticate to Azure resources in the same way they would in a “real” environment, without me having to stuff secrets into config files or pass credentials around by hand.
In this post, let’s take the next step and configure workload identity on an Azure Arc-enabled Kubernetes cluster so that a pod running locally can retrieve a secret from Azure Key Vault.
What is workload identity?
Workload identity, put simply, gives a workload running in Kubernetes a way to authenticate to Microsoft Entra protected resources without needing a client secret or certificate.
What this actually means for us is that we can map a Kubernetes service account to an identity in Azure, let Entra trust tokens issued by the cluster, and then use that trust to get access tokens for Azure resources.
So instead of baking credentials into a pod, or storing them in a secret somewhere and pretending that is fine, we let the cluster issue a signed token for the workload and let Azure do the rest.
Official documentation for Azure Arc-enabled Kubernetes workload identity can be found here.
Getting started - Pre-requisites.
Before we can get started, we need to make sure that we have a few things in place:
Software:
- Docker Desktop - our local cluster runs inside it.
- k3d - runs a real k3s cluster in Docker.
brew install k3d, orchoco install k3don Windows. - kubectl - We will use this to create the service account and test pod.
- PowerShell 7 - c’mon, you already know why.
Workload identity on Arc only supports a specific set of distributions - K3s on Ubuntu, AKS enabled by Azure Arc, Red Hat OpenShift, VMware Tanzu TKGm and AKS Edge Essentials. The Kubernetes that ships inside Docker Desktop, which we used in the last post, is not one of them. Neither is kind.
I know, I know - I have just told you to throw away the cluster we built together in the last post, and I am sorry about that, but there is a very good reason for it. Further down the page we have to hand the API server a brand new service-account-issuer and restart it, and Docker Desktop simply won’t let us anywhere near that.
That’s what k3d is for - real k3s, running inside Docker, with an API server we can actually configure. One command and we’re ready to go!
k3d cluster create arc-local-cluster --servers 1 --agents 0 --wait
Permissions:
Over the course of this post we are going to create a resource group, an Arc-connected cluster, a Key Vault, a managed identity and a role assignment.
That last one is the catch. Microsoft.Authorization/roleAssignments/write isn’t part of Contributor, so if that is all you have been given, you will sail happily through most of this post and then fall flat on your face at the RBAC step. Owner on the subscription is the easy answer, or Contributor plus Role Based Access Control Administrator if you would rather keep things tidy.
PowerShell Modules:
Install the required PowerShell modules by running the following command:
$modules = @("Az.Accounts", "Az.Resources", "Az.ConnectedKubernetes", "Az.ManagedServiceIdentity", "Az.KeyVault")
$modules | ForEach-Object { Install-Module -Name $_ -Force -AllowClobber -Scope CurrentUser }
If you already have these installed, it’s worth checking that the Az.ConnectedKubernetes module is up to date, as the workload identity switches were only added fairly recently.
Enabling workload identity on the cluster
Let’s begin by defining a few variables for our cluster and Azure resources.
$tenantId = 'myTenantId'
$subscriptionId = 'mySubscriptionId'
$resourceGroupName = 'rg-arc-workload-identity'
$location = 'eastus'
$clusterName = 'arc-local-cluster'

Connect-AzAccount -Subscription $subscriptionId -Tenant $tenantId
Set-AzContext -SubscriptionId $subscriptionId | Out-Null

New-AzResourceGroup -Name $resourceGroupName -Location $location -Force | Out-Null
If this is a subscription you have never onboarded Arc into before, register the resource providers before you go any further. They take a few minutes to flip over to Registered, and if they haven’t, Arc onboarding falls over with an error that tells you almost nothing about why.
$providers = @("Microsoft.Kubernetes", "Microsoft.KubernetesConfiguration", "Microsoft.ExtendedLocation")
$providers | ForEach-Object { Register-AzResourceProvider -ProviderNamespace $_ | Out-Null }

$providers | ForEach-Object {
    Get-AzResourceProvider -ProviderNamespace $_ |
        Select-Object -First 1 ProviderNamespace, RegistrationState
}
Because we all love PowerShell, I’m going to show the Arc connection step again using the PowerShell cmdlet with workload identity enabled from the start.
If you are building this lab fresh, use the following command when you connect the cluster to Azure Arc:
$k8sParams = @{
    ClusterName              = $clusterName
    ResourceGroupName        = $resourceGroupName
    SubscriptionId           = $subscriptionId
    Location                 = $location
    OidcIssuerProfileEnabled = $true
    WorkloadIdentityEnabled  = $true
}

New-AzConnectedKubernetes @k8sParams -AcceptEULA -Verbose
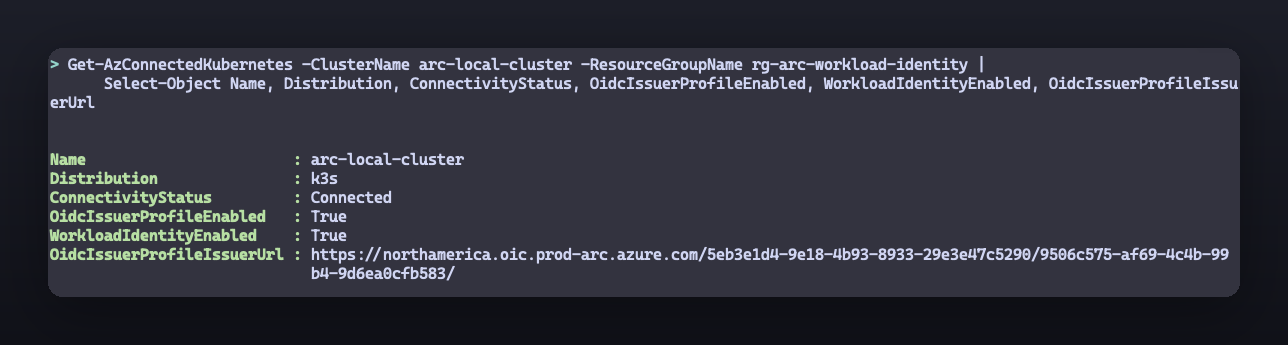
Once that’s finished, grab the issuer URL. We’ll need it twice - once to configure the API server, and again when we create the federated credential.
One little gotcha here - the Az cmdlets flatten the profile, so the property you want is OidcIssuerProfileIssuerUrl, and not the nested OidcIssuerProfile.IssuerUrl that you would expect coming from the REST payload.
$connectedCluster = Get-AzConnectedKubernetes -ClusterName $clusterName -ResourceGroupName $resourceGroupName
$oidcIssuer = $connectedCluster.OidcIssuerProfileIssuerUrl

$connectedCluster | Select-Object Name, Distribution, ConnectivityStatus,
    OidcIssuerProfileEnabled, WorkloadIdentityEnabled, OidcIssuerProfileIssuerUrl
Telling the API server about the issuer
Here’s the big step I missed (and most others do).
Enabling the feature over in Azure hands us an issuer URL and installs the mutating webhook, which certainly feels like we’re done here. We’re not! The cluster is still merrily signing service account tokens with its own issuer, and Entra is going to reject every single one of them, because it has never heard of that issuer in its life.
So we need to tell the API server to stamp the Arc issuer URL into every token it signs. On k3s that means dropping the issuer into the config file and bouncing the API server.
$k3sConfig = @"
kube-apiserver-arg:
  - "service-account-issuer=$oidcIssuer"
  - "service-account-max-token-expiration=24h"
"@

# k3d runs k3s inside a container, so we write the config there and restart it.
$serverNode = "k3d-$clusterName-server-0"
$k3sConfig | docker exec -i $serverNode sh -c 'mkdir -p /etc/rancher/k3s && cat > /etc/rancher/k3s/config.yaml'
docker restart $serverNode
If you are running K3s on a host you own outright, it is the same file at /etc/rancher/k3s/config.yaml followed by a systemctl restart k3s. Other distributions handle it differently, and the
official documentation covers OpenShift and Tanzu.
Give the cluster a moment to come back, then let’s prove that the tokens really are being signed with the Arc issuer. Please don’t skip this bit - it will save you a lot of pain later:
$token = kubectl create token default
$payload = $token.Split('.')[1].Replace('-', '+').Replace('_', '/')
$payload = $payload.PadRight($payload.Length + (4 - $payload.Length % 4) % 4, '=')
[Text.Encoding]::UTF8.GetString([Convert]::FromBase64String($payload)) | ConvertFrom-Json | Select-Object iss, sub
The iss value that comes back should be your Arc issuer URL. If it’s still showing the k3s default, the API server hasn’t picked up the config and nothing past this point is going to work.
Creating the Azure resources
Now that the cluster side is ready, we need something in Azure for the workload to authenticate as, and something useful to authenticate to.
For this demo, I’m going to create:
- A user-assigned managed identity.
- A Key Vault.
- A test secret inside that Key Vault.
Let’s define the remaining variables first.
$suffix = Get-Random -Minimum 10000 -Maximum 99999
$keyVaultName = "kvlocalarc$suffix"
$secretName = 'LocalClusterSecret'
$identityName = 'id-local-cluster-kv'
$federatedCredentialName = 'local-cluster-kv-fic'
Now we can create the Key Vault and our test secret.
$keyVaultParams = @{
    Name              = $keyVaultName
    ResourceGroupName = $resourceGroupName
    Location          = $location
}

$keyVault = New-AzKeyVault @keyVaultParams

$secretValue = ConvertTo-SecureString 'Hello from Azure Arc workload identity!' -AsPlainText -Force
Set-AzKeyVaultSecret -VaultName $keyVaultName -Name $secretName -SecretValue $secretValue | Out-Null
New vaults are created with RBAC rather than access policies these days, which is exactly what we are after here, as it means the Key Vault Secrets User role we hand out in a minute is all the pod will ever need. If you get a permission error writing that secret, give your own account Key Vault Secrets Officer over the vault and try again.
And now the user-assigned managed identity.
$identityParams = @{
    Name              = $identityName
    ResourceGroupName = $resourceGroupName
    Location          = $location
}

$identity = New-AzUserAssignedIdentity @identityParams

$clientId = $identity.ClientId
$principalId = $identity.PrincipalId
$keyVaultResourceId = $keyVault.ResourceId
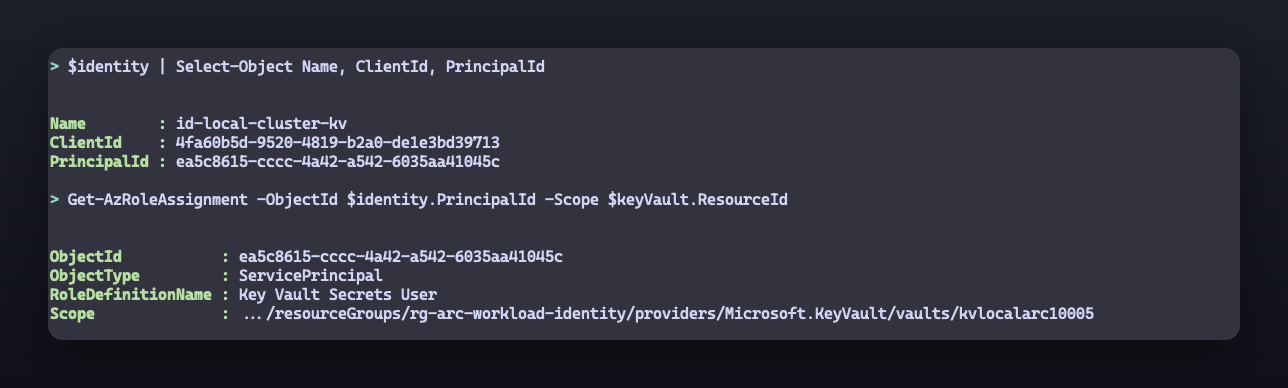
Finally, give the managed identity rights to read secrets from the vault.
$roleParams = @{
    ObjectId           = $principalId
    ObjectType         = 'ServicePrincipal'
    RoleDefinitionName = 'Key Vault Secrets User'
    Scope              = $keyVaultResourceId
}

New-AzRoleAssignment @roleParams
Creating the Kubernetes service account
Now we need a service account in Kubernetes that points at the managed identity we just created.
$serviceAccountNamespace = 'workload-identity'
$serviceAccountName = 'kv-reader'

kubectl create namespace $serviceAccountNamespace
Now create a file called serviceAccount.yaml with the following content and apply it. Substitute the client ID we captured earlier, and your tenant ID.
apiVersion: v1
kind: ServiceAccount
metadata:
  name: kv-reader
  namespace: workload-identity
  annotations:
    azure.workload.identity/client-id: "4fa60b5d-9520-4819-b2a0-de1e3bd39713"
    azure.workload.identity/tenant-id: "00000000-0000-0000-0000-000000000000"
If you would rather not hand-edit the file, generate it from the variables we already have:
@"
apiVersion: v1
kind: ServiceAccount
metadata:
  name: $serviceAccountName
  namespace: $serviceAccountNamespace
  annotations:
    azure.workload.identity/client-id: "$clientId"
    azure.workload.identity/tenant-id: "$tenantId"
"@ | Set-Content -Path .\serviceAccount.yaml -Encoding utf8
kubectl apply -f .\serviceAccount.yaml
That’s the Kubernetes side of the identity mapping sorted. Our service account now knows which Azure identity it wants to be, but Azure doesn’t trust a single thing coming out of our cluster yet, so let’s go and fix that.
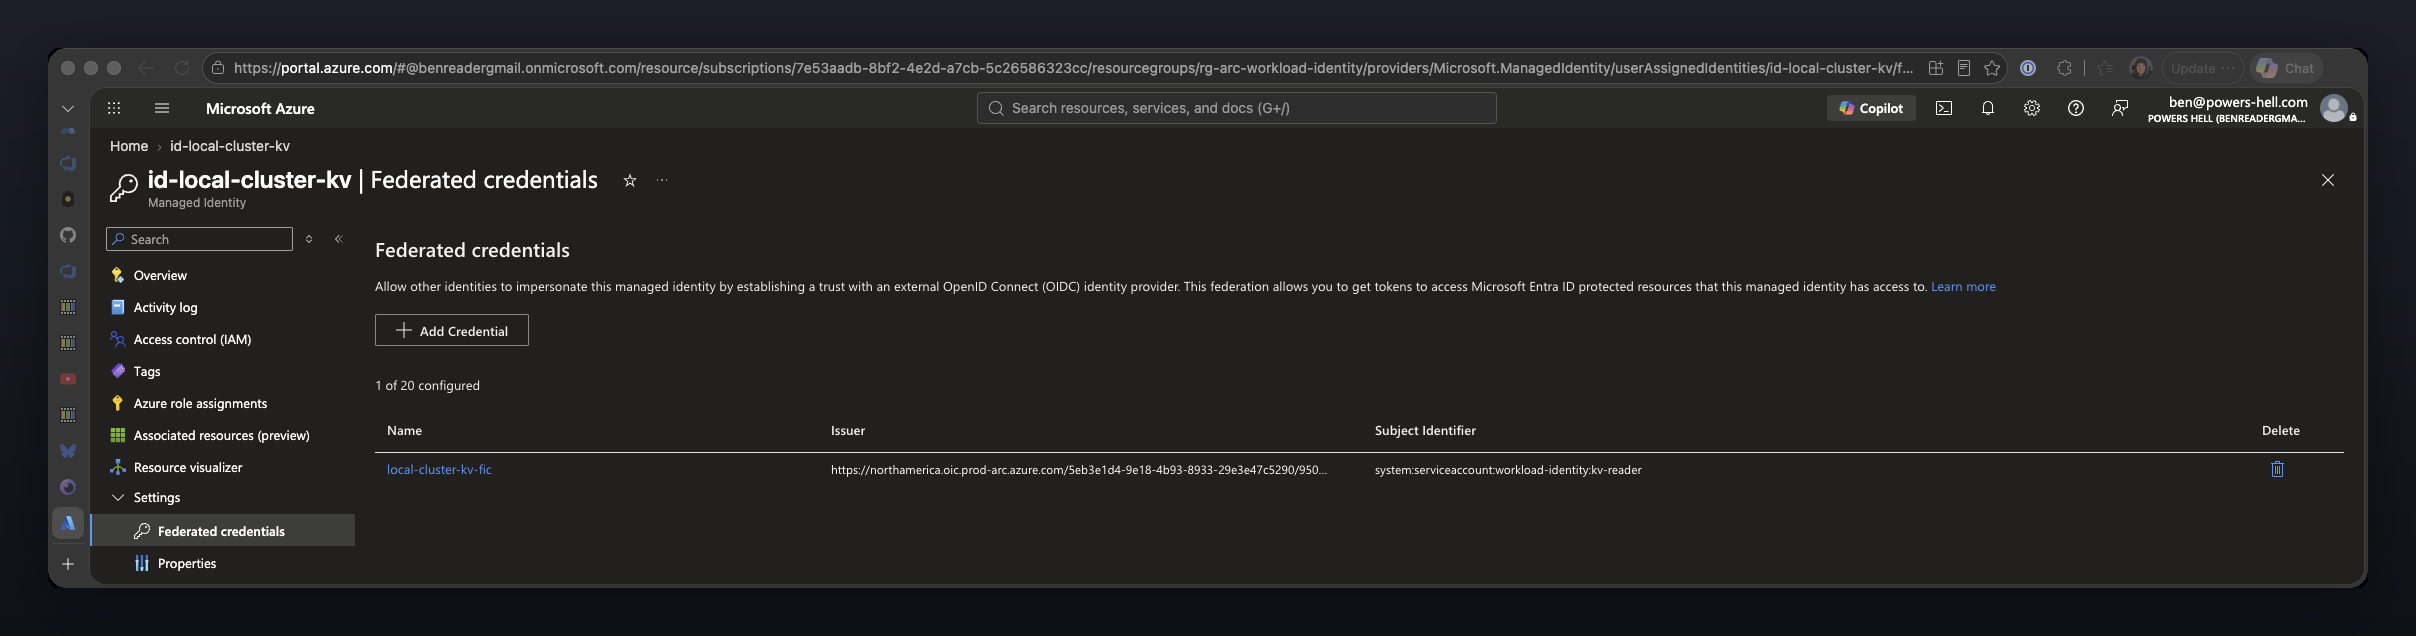
Creating the federated credential
This is the secret sauce!
We are telling Azure to trust tokens issued by our Arc-connected cluster, but only when the subject inside the token matches the service account we just created. Anything else gets rejected.
$ficParams = @{
    Name              = $federatedCredentialName
    IdentityName      = $identityName
    ResourceGroupName = $resourceGroupName
    Issuer            = $oidcIssuer
    Subject           = "system:serviceaccount:${serviceAccountNamespace}:${serviceAccountName}"
    Audience          = @('api://AzureADTokenExchange')
}

New-AzFederatedIdentityCredential @ficParams
If you have not seen that subject format before, it’s simply the fully qualified identity of the Kubernetes service account.
Watch the ${} around those variable names, by the way. Without them PowerShell reads $serviceAccountNamespace: as a drive-qualified variable and throws a parser error at you, which is an extremely annoying five minutes of your life to get back.
Note: It can take a few seconds for the federated credential to propagate. If the first authentication attempt fails, wait a moment and try again before you start tearing your manifests apart.
Testing it from the cluster
Now for the bit that actually matters.
Let’s create a pod that uses our service account, let the workload identity webhook inject the environment variables and the projected token, and then use PowerShell and the Az modules to swap that token for real access to Key Vault.
First, let’s create a pod manifest file named workloadIdentityTest.yaml.
apiVersion: v1
kind: Pod
metadata:
  name: workload-identity-test
  namespace: workload-identity
  labels:
    azure.workload.identity/use: "true"
spec:
  serviceAccountName: kv-reader
  containers:
    - name: powershell
      image: mcr.microsoft.com/azure-powershell:latest
      command: ["pwsh", "-Command"]
      args:
        - |
          Disable-AzContextAutosave -Scope Process | Out-Null
          $federatedToken = Get-Content -Path $env:AZURE_FEDERATED_TOKEN_FILE -Raw
          Connect-AzAccount -ServicePrincipal -ApplicationId $env:AZURE_CLIENT_ID -Tenant $env:AZURE_TENANT_ID -FederatedToken $federatedToken | Out-Null
          $secret = Get-AzKeyVaultSecret -VaultName kvlocalarc10005 -Name LocalClusterSecret -AsPlainText
          Write-Output $secret
          Start-Sleep -Seconds 3600
  nodeSelector:
    kubernetes.io/os: linux
Swap kvlocalarc10005 for your own vault name - it’s sitting in $keyVaultName if you’re following along.
That first line does a lot more than it looks like it does. By default the Az modules cache your context out to AzureRmContext.json in the user profile, and because we are authenticating with a client assertion, the token material goes along for the ride. Az will even warn you about it in the pod logs.
We really don’t want that. The entire point of workload identity is a credential that’s short lived and lives in memory, so writing it out to a container filesystem rather undoes all of our hard work. Disable-AzContextAutosave -Scope Process keeps the context exactly where it belongs.
$testPodName = 'workload-identity-test'
kubectl apply -f .\workloadIdentityTest.yaml
There are three important bits in that manifest:
- The service account name is set to our annotated service account.
- The pod carries the label
azure.workload.identity/use: "true", which is what tells the mutating webhook to inject the projected token and the Azure environment variables. - Context autosave is switched off, so the assertion never touches the container filesystem.
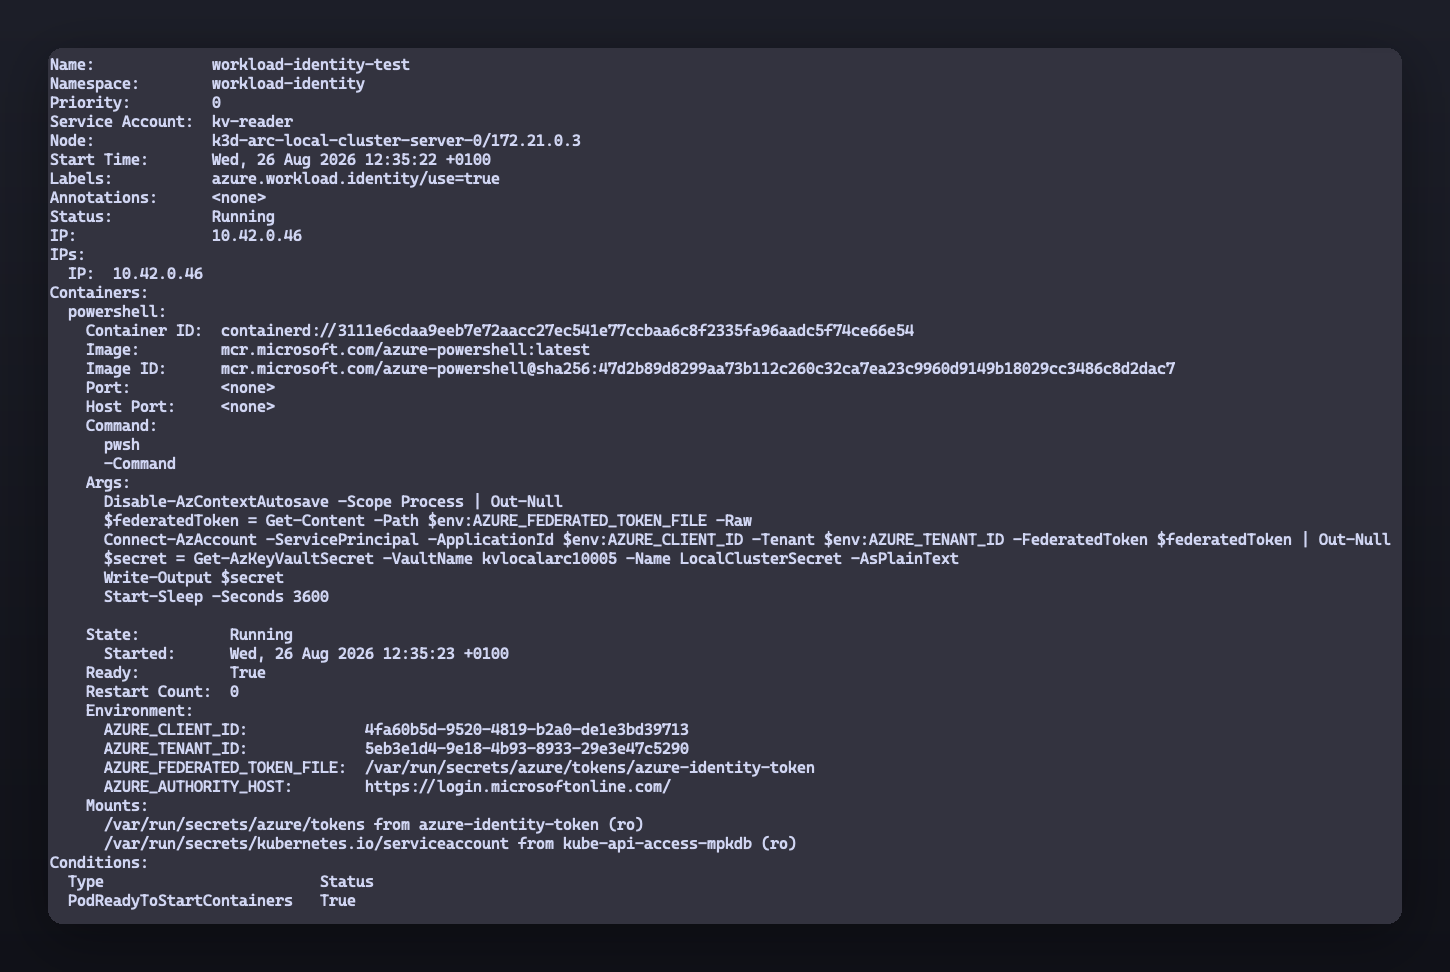
Once the pod is running, let’s check that the webhook has done its job.
kubectl describe pod $testPodName -n $serviceAccountNamespace
If everything’s wired up correctly, you’ll see environment variables like AZURE_CLIENT_ID, AZURE_TENANT_ID, AZURE_AUTHORITY_HOST and a path to the projected token file - none of which we put there ourselves!
Now check the logs.
kubectl logs $testPodName -n $serviceAccountNamespace
And if it’s all gone to plan, the pod should print out the secret we stashed in Key Vault earlier!

If it doesn’t work first time
Don’t panic. There are a handful of places this can come unstuck, and thankfully they are all easy enough to check.
- The issuer URL in the federated credential has to match the OIDC issuer that the Arc cluster reports. Exactly. Trailing slash and all.
- The API server has to actually be signing tokens with that issuer. Decode a token with the snippet from earlier and look at the
issclaim - this is the one that catches almost everybody. - The subject in the federated credential has to match
system:serviceaccount:<namespace>:<serviceaccountname>. - The pod has to be using the service account you annotated, and not
default. - The pod needs that
azure.workload.identity/use: "true"label, otherwise the webhook ignores it completely. - The managed identity needs
Key Vault Secrets Userover the vault, and the vault needs to be using RBAC rather than access policies. - If you created the federated credential and immediately tested it, go and make yourself a coffee, then try again. Propagation delays are absolutely a thing.
When I am debugging this, I start at kubectl describe pod, then move on to the pod logs, and only then do I wander back into Azure to look at the federated credential and the role assignments. Nine times out of ten, the answer is sitting right there in the pod.
Conclusion
So there we have it - we have taken an Azure Arc-enabled Kubernetes cluster, switched on workload identity, pointed the API server at the Arc issuer, mapped a Kubernetes service account to a user-assigned managed identity, and used the whole lot to pull a secret straight out of Azure Key Vault.
And there is not a secret, a certificate or a connection string anywhere near that pod! The cluster signs a token, Entra trusts it because we told it to, and the workload gets exactly the access we granted it and absolutely nothing else.
And this is where the local hybrid setup starts to get really interesting! We are no longer just staring at a local cluster through the Azure portal - we’re running workloads locally that authenticate to Azure exactly the way they would if they were sitting in Azure on an AKS instance.
As always, the code for todays post is available on GitHub.
Stay tuned for the next article, where I will take this pattern and put it to work inside an actual workload, so that our humble little local cluster starts behaving a lot more like something we would be happy to ship!